3D Filaments
Do you need help with any of our filaments?
El PETG MATTE es un filamento con un acabado muy profesional ya que elimina los brillos característicos de este material. El aditivo que utilizamos para conseguir este efecto es totalmente compatible con la impresión 3D, pero modifica ligeramente las propiedades del filamento.
Este aditivo le otorga al material una gran capacidad de enfriamiento, lo que hace que el filamento se solidifique rápidamente después de ser extruido. Esto es genial para realizar detalles o partes colgantes, pero si no se configura bien, puede llevar a que las capas no queden unidas perfectamente. Si este es tu caso, prueba las siguientes recomendaciones:
- Aumenta la temperatura de impresión: Con el PETG MATTE debes utilizar una temperatura ligeramente superior que con el PETG Brillo. Para su correcto funcionamiento se debe imprimir a una temperatura superior a 245ºC.
- Disminuye el ventilador de capa: Con el PETG MATTE no es necesario, en la mayoría de los casos, utilizar ventilador de capa. Si experimentas problemas de adhesión entre capas prueba desactivarlo o reducirlo al 10%
At 3DFILS we are always willing to help you get the best results when you use our 3D printing filaments.
On each product page, as well as on the filament box, you will find the general printing parameters for each material.
At 3DFils we cannot offer you a specific printing profile that guarantees that the filament works perfectly in your printer. This is because we cannot test all the printers on the market to adjust the specific printing parameters for each machine. We would have to do this taking into account the possible modifications that can be made to each 3D printer, which for us is impossible.
Additionally, printing parameters may vary depending on the finish and properties you are looking for.
Our recommendation is that you start working with our parameters and little by little adjust them until you obtain the desired result. Remember that you can contact us for help whenever you need it.
The materials used for FDM 3D printing are known as polymers. One of the properties that these polymers have in common is that they are hygroscopic, that is, they can attract, to a greater or lesser extent, moisture from their environment and incorporate it into their molecular structure. This modifies its composition and can cause a 3D printing filament to not behave as it should.
How to prevent humidity in 3D printer filaments?
At 3DFils we are aware of the problems that a wet filament can cause. That is why we provide our filaments vacuum packed in metalized bags with silica gel inside. Even so, you should know that once the filament is opened, it can absorb enough moisture to render it unusable within 24 hours, depending on the material.
To avoid this, you must store the filaments correctly, in a container isolated from the outside and with a desiccant that absorbs ambient humidity. There are professional solutions for this and some that you can make yourself.
How do you know if the 3D filament has absorbed moisture?
The clearest sign that a 3D printing filament has absorbed moisture is that you will begin to see a poor aesthetic finish on your printed pieces. Gaps, dripping material, excess threads... are some of the most common problems that a wet filament can cause.
Some filaments are more sensitive to humidity than others, so the effect you may notice will be different. In PLA, you will see that the material becomes more brittle. In PETG you will notice an excess of threads running through all the points where the extruder of your 3D printer has passed and poor adhesion between layers. What is common to all materials is the poor aesthetic finish of the pieces.
Should I dry the 3D filaments before each print?
It depends on the material you are going to use and the quality you need for your pieces. For a good finish the answer is clear, yes, you must always dry the material before printing any piece. This does not apply if you already keep the material dry. As a general rule, you should always print with your 3D printing filament dry.
Now, there are materials that are more demanding than others. You can print PLA even if it has accumulated some moisture and you probably won't notice any difference. Other materials such as PETG, TPU or Nylon are more sensitive to humidity. Working with these materials you will not be able to obtain good results if you do not print with the filament completely dry.
How to dry 3D printer filament?
Below we provide a table with the recommended temperatures and drying times for each material:
| Material | Temperature | Time |
| PLA | 45ºC | 6 hours |
| TPU | 60ºC | 8 hours |
| PETG | 60ºC | 6 hours |
| ASA | 85ºC | 4 hours |
| PC | 85ºC | 5 hours |
| PA | 90ºC | 6 hours |
To dry the filament you can use:
- Dryingr of filaments: There are devices designed specifically for this function. These not only dry your filament but keep it in optimal condition for printing. Some can even be used at the same time as printing.
- Oven:It is possible to dry the filaments in a domestic oven. If you are going to use it, you must insert an external thermometer to ensure that the temperature is correct, since the fluctuations of these appliances can damage the material.
- Food Dehydrator: It is possible to use a food dehydrator to dry your 3D filament. Make sure the working temperature of the dehydrator is appropriate for the material you want to dry.
Once dry, keep the filament well stored.
Flexible Filaments
Printing flexible filament is more complicated than working with rigid filaments. By their very nature, they present various problems when using them, especially if you do not have a 3D printer prepared to work with them. However, with a good configuration of our 3D printer it is very easy to obtain great results with a good printing speed.
In this section you will find everything you need to work with flexible filament in your 3D printer. If you see that something is missing, do not hesitate to contact us.
First Steps
Extruder for flexible filament
The most important thing to print with flexible filament is to have a good extruder. Most commercial 3D printers already incorporate a compatible extruder, for more information on compatible printers visit the corresponding section in the section of the material you want to print in this article. If you have a RepRap printer and you do not have a compatible extruder, there are several alternatives on the market and also many freely designed extruders that you can use to improve your printer.
The key points to take into account when choosing an extruder are the following:
- Filament guidance
- Friction
- Filament pull
- Nozzle size
Filament guidance
Any slight gap between the flexible filament pushing system and its entrance to the hot-end can cause the filament to begin to wind in this gap.
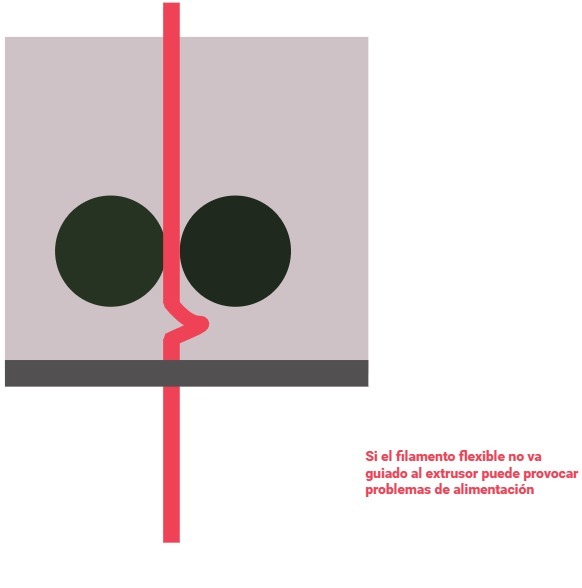
To solve this, we need this gap not to exist in our extruder. The objective is for the filament to be completely guided to the hot-end.
.jpg) |
Commercial extruders prepared for printing withflexible materials will not present this problem. If you have a RepRap extruder you have two options, either assemble a new one that is prepared or print a wedge-shaped part that solves this problem. Although the best option is to update our extruder.
Friction
Excessive friction of the filament with the extruder elements can cause problems in the feeding of material.
To solve this problem there are several things we can do. The first thing is to use direct extrusion systems. In a Bowden system, excessive friction of the filament with the guiding tube is generated.
We must also ensure that the distance between the pulleys and the hot-end is as small as possible.
Another very important aspect is to work with barrels in the hot-end that have a PTFE tube incorporated. The Teflon tube (PTFE) reduces friction and acts as a thermal insulator, preventing the filament from expanding before reaching the hotend heating zone.
Filament traction
Unlike with rigid filaments, achieving good traction with flexible material is more complicated.
We must look for an extruder that allows us to adapt the traction that is carried out on the filament. The most used system for this has always been a lever-like arm pressing the filament thanks to the force of a spring.
.jpg) |
Now we have more complex systems that offer better results. Also work with two toothed pulleys instead of a pulley and a bearing. If the filament slips on the bearing, we will not get optimal traction from it.
Nozzle size
The size of the nozzle is related to the quality of the printed pieces. The smaller the size, the lower layer height we can achieve and therefore greater definition in the piece.
However, when dealing with flexible filament a very small nozzle size can cause excessive pressure inside the hot-end, which will cause the output flow toof the material is not constant.
The printing speed that we can achieve withflexible material is also directly related to the size of the nozzle. We can obtain the best quality/speed ratio using 0.4 to 0.6 mm nozzles.
Once we have chosen the perfect extruder to work with flexible filament, we are going to see the first steps to start printing.
The first thing is, of course, the loading of the filament in our printer. For this, the ideal is that we work with an exclusive hot-end for flexible filament.
If this is not our case, we will first remove the previous filament. It is advisable to extrude a little before removing the filament. With this we will be able to eliminate impurities at the nozzle outlet and ensure that the material flows correctly.
Once removed, we will set our hot-end to the recommended temperature to work with each material (see corresponding section). Once the filament has been introduced and seeing that it comes out of the nozzle, it is advisable to extrude a little filament, especially if We make the change from something hard like PLA or ABS.
And we are almost ready to print! Now depending on which filament you are going to work with, you should visit its corresponding section for the particular considerations of each one.
Tips
To achieve perfect results it is necessary to modify our printing profile depending on what we want to achieve.
Hanging parts
It is possible to print hanging parts with eFil, for this we will need an extruder that has a layer fan. Most extruders today have this. If yours does not have it, you can try to improve it with the following parts:
By activating the layer fan when our 3D design has exposed parts, we will ensure that these solidify sooner and serve as support for the following layers.
  |
Support
Using support with eFil can be problematic when removing it, since it will be very adhered to the piece. To do this, it is recommended that when designing the piece we add supports whose contact with the piece is as minimal as possible.
Troubleshooting
Threads
The appearance of threads in a piece may not be critical for the result of our printing but it may cause a poor finish.
The parameters directly related to these problems are retraction and printing temperature. By decreasing the printing temperature and increasing the retraction we should eliminate the threads. We must be careful not to stray too far from the recommended parameters.
A very interesting option that almost all slicers incorporate is “Avoid crossing perimeters”. This option will force the machine not to cross the perimeters of the piece while the head is moving. This will largely prevent the appearance of threads, although it can have a negative impact on printing time.
 |
 |
Adhesion to the printing surface
Parts coming off during printing is usually not a problem with flexible filaments. What's more, we may find ourselves with excess adhesion that prevents us from removing the pieces once printed.
To help with the removal of the pieces we can use acetone or alcohol.
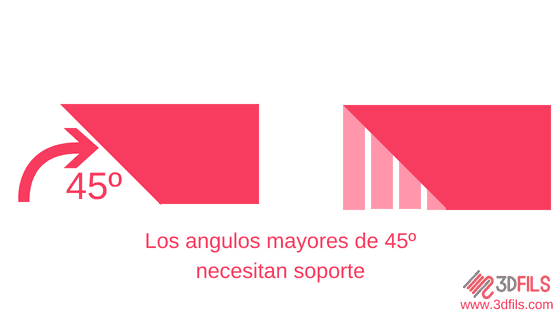
As you all know in 3D printing objects are built layer by layer. This implies that each layer supports the next layer. This next layer may not coincide exactly with the previous one, which causes part of the layer to be exposed, that is, without being supported by the previous layer.
There is a point where this is not possible since the upper layers do not have enough support from the lower ones. This occurs when we exceed an angle of 45º. To solve this problem and for the piece to hold up during printing we need to use the support structures.
What are support structures in 3D printing?
The support structures are elements that are printed together with the model but that are not part of the original design and that serve to support the protruding parts of the models that exceed 45º.
These support structures can be made of the same material as the main piece or, if we have an extra extruder, of another material that is easier to remove.
The support structures are created from the same program with which we prepare the 3D printing and their correct configuration is crucial to obtain a good finish in the parts in which we use them.
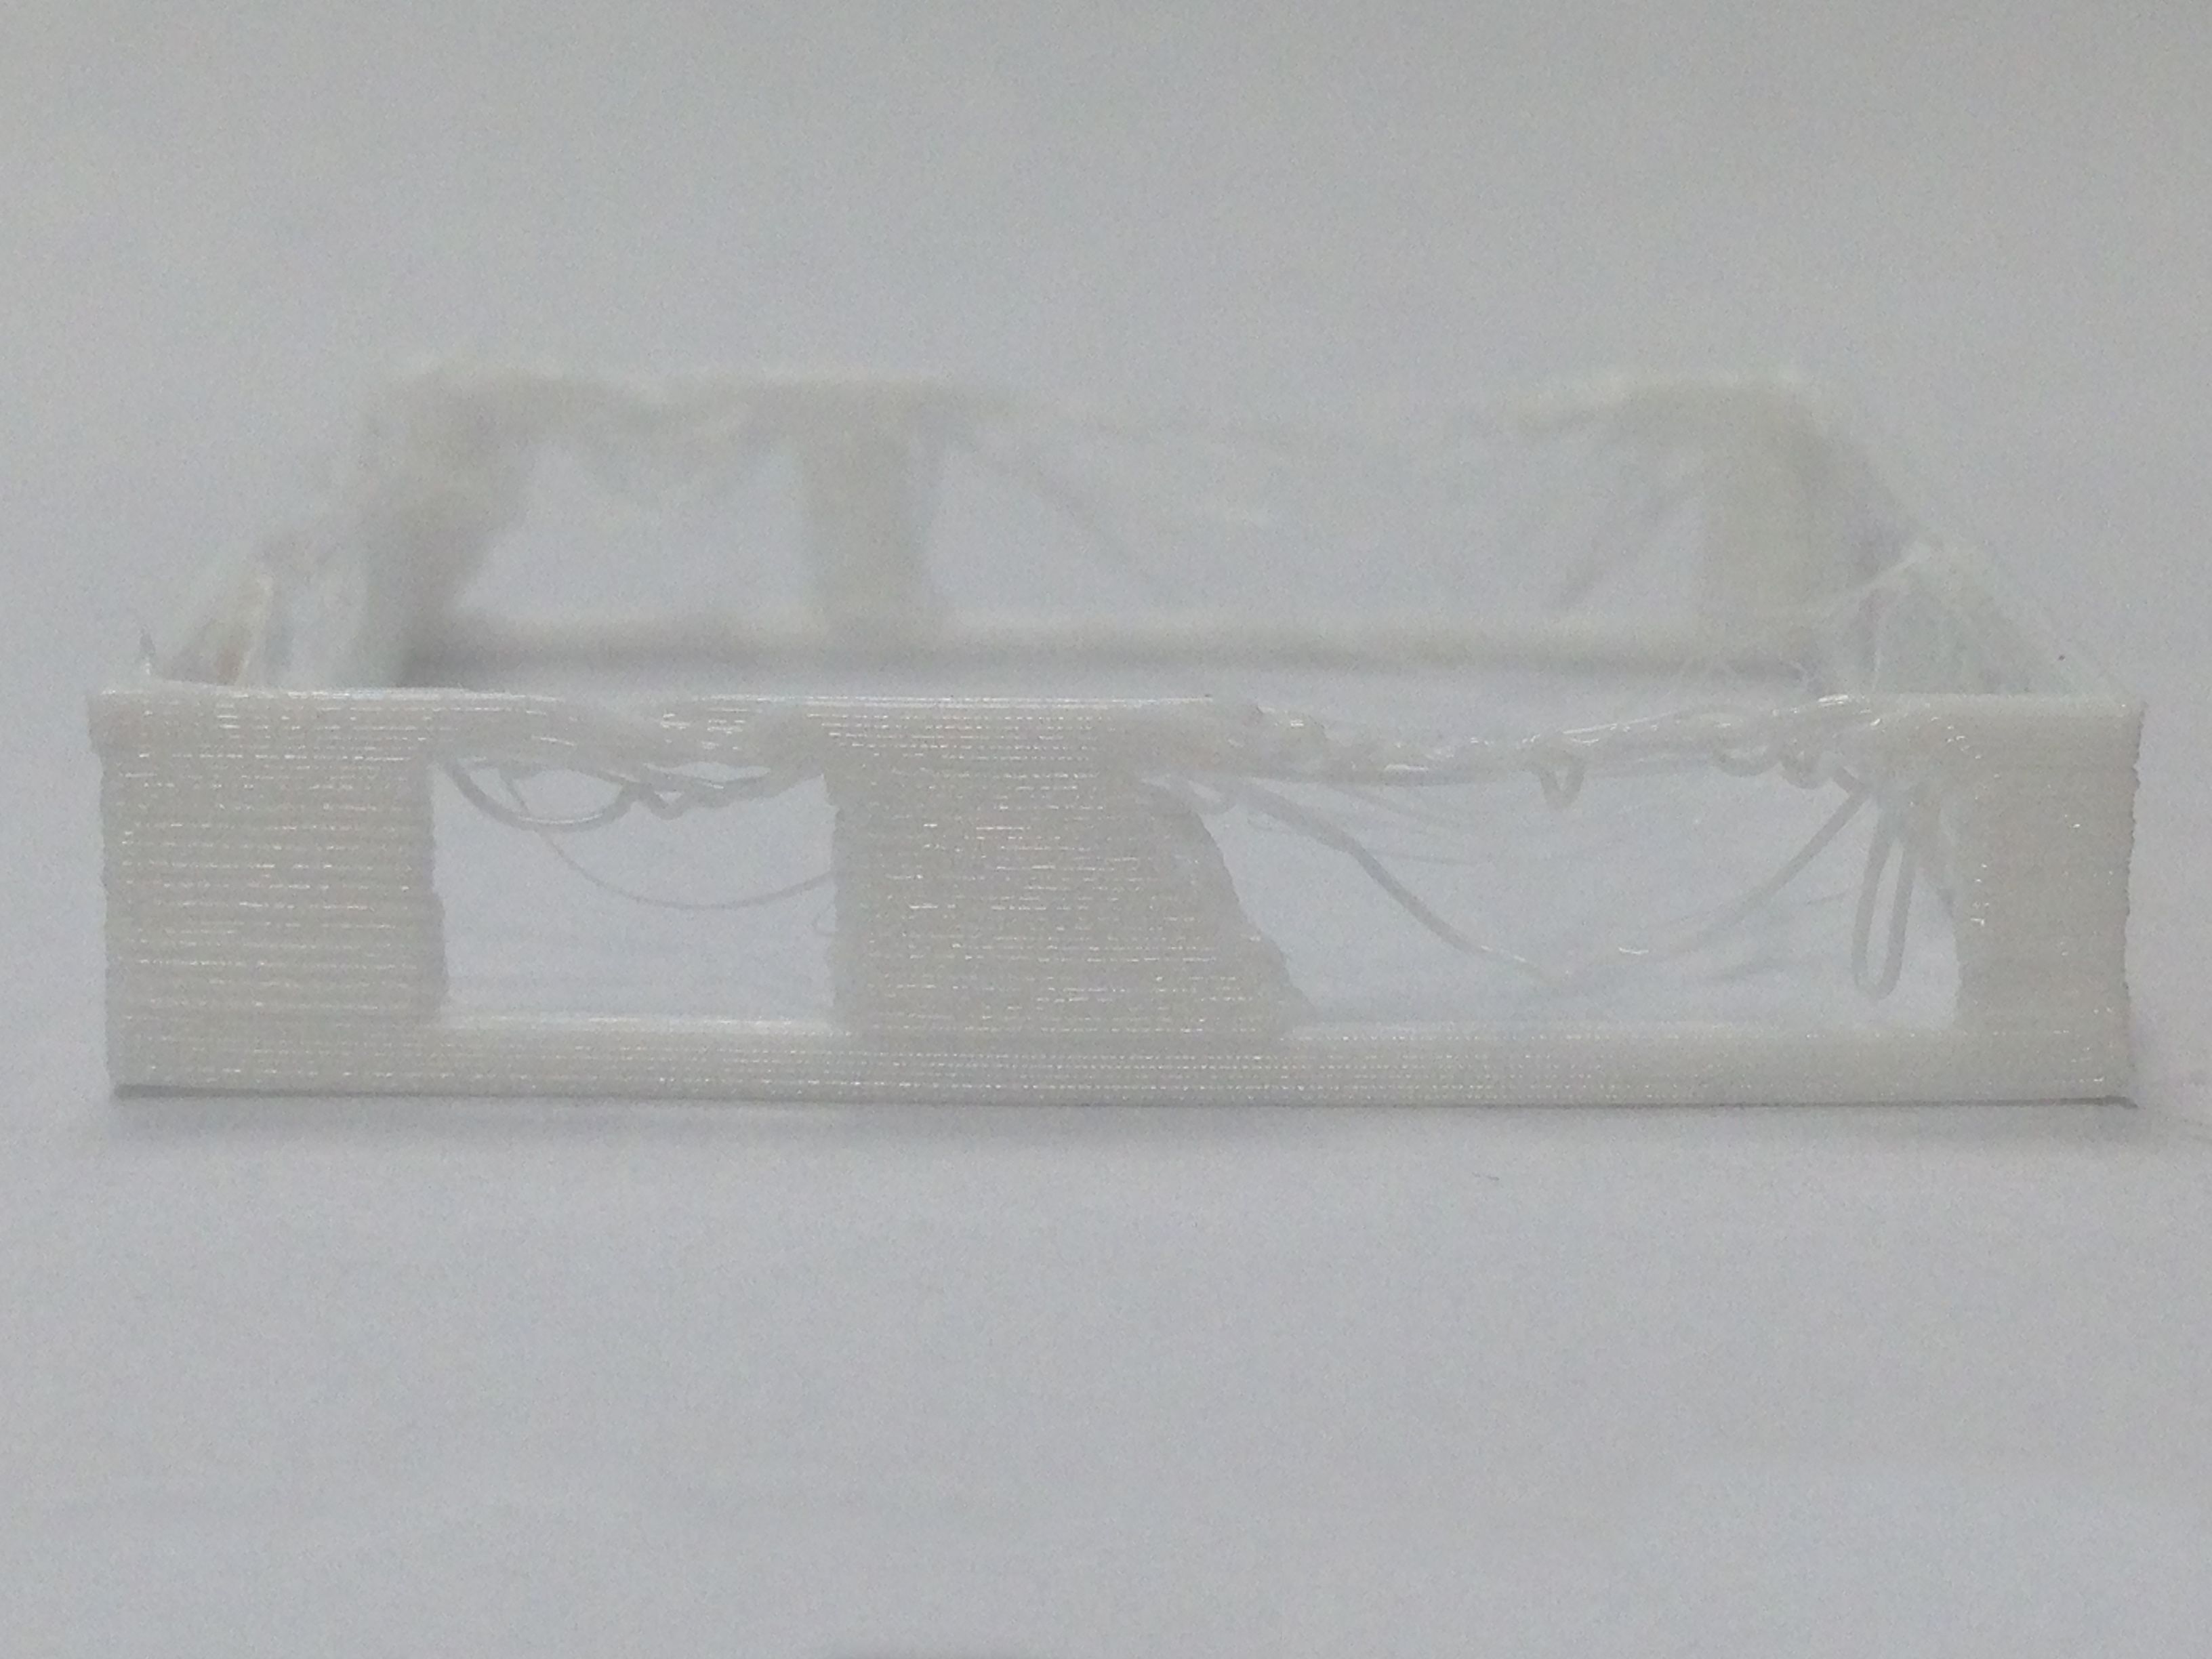
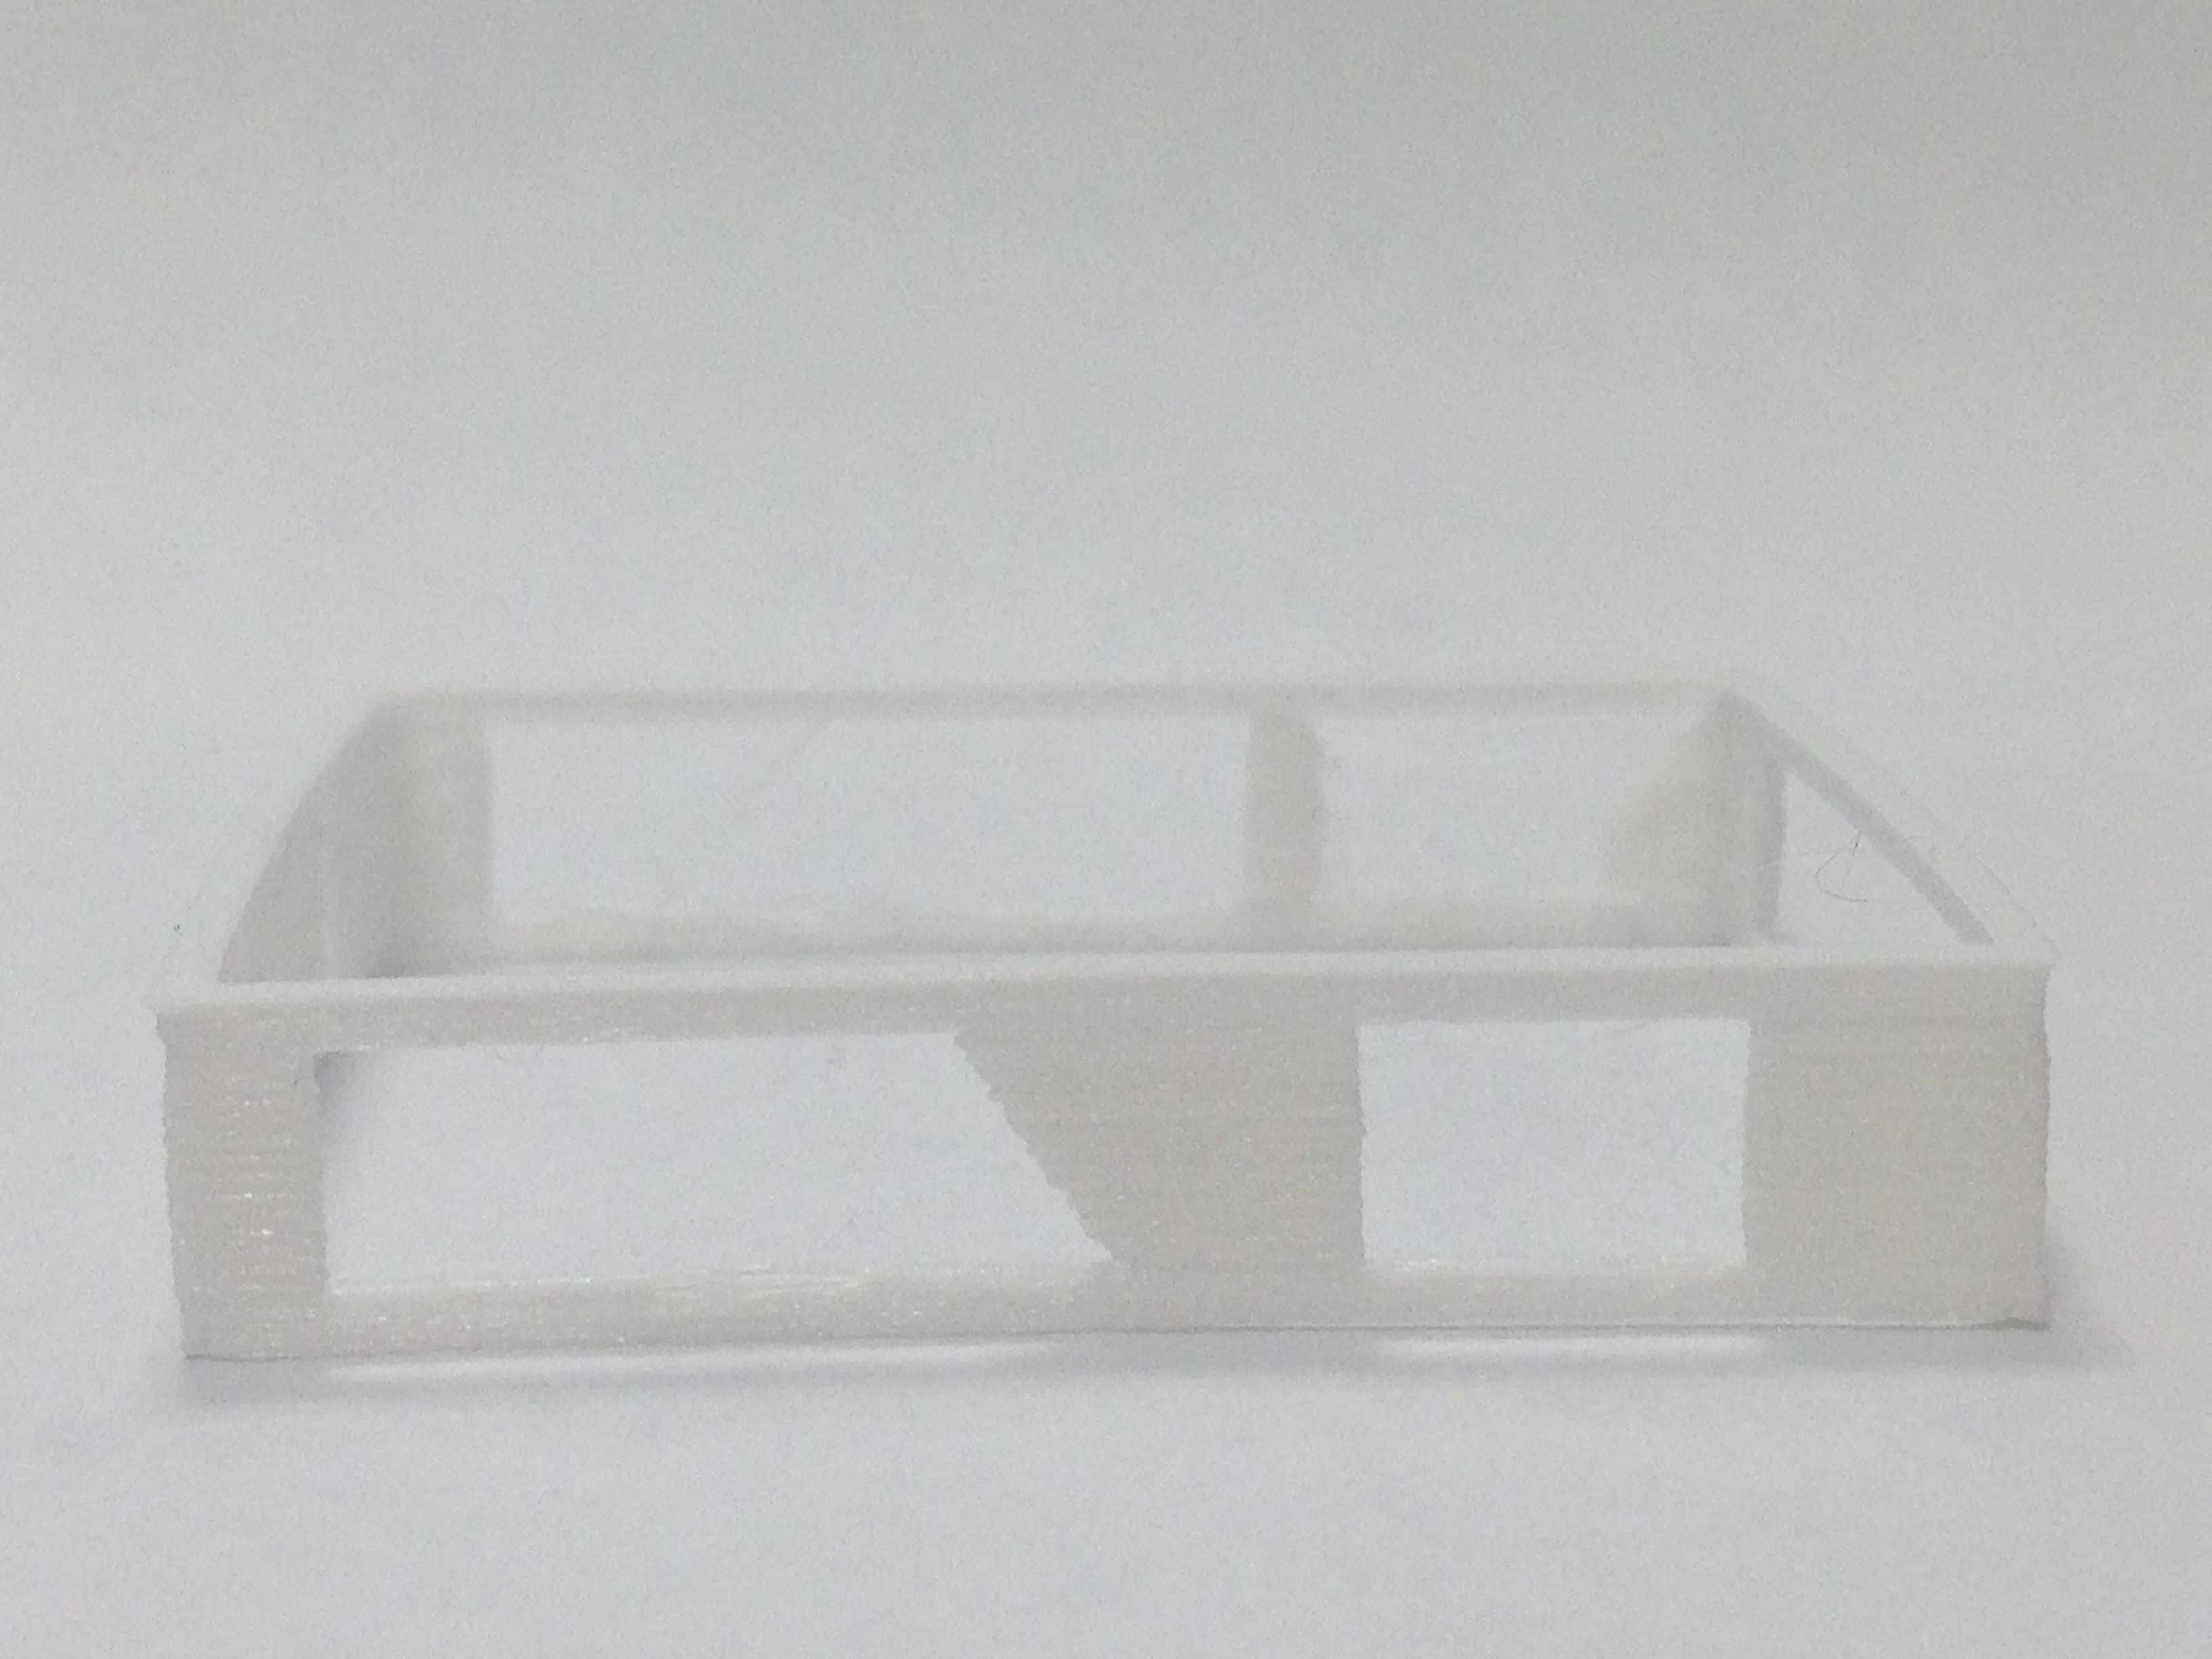
The support problem with flexible materials
\r\n
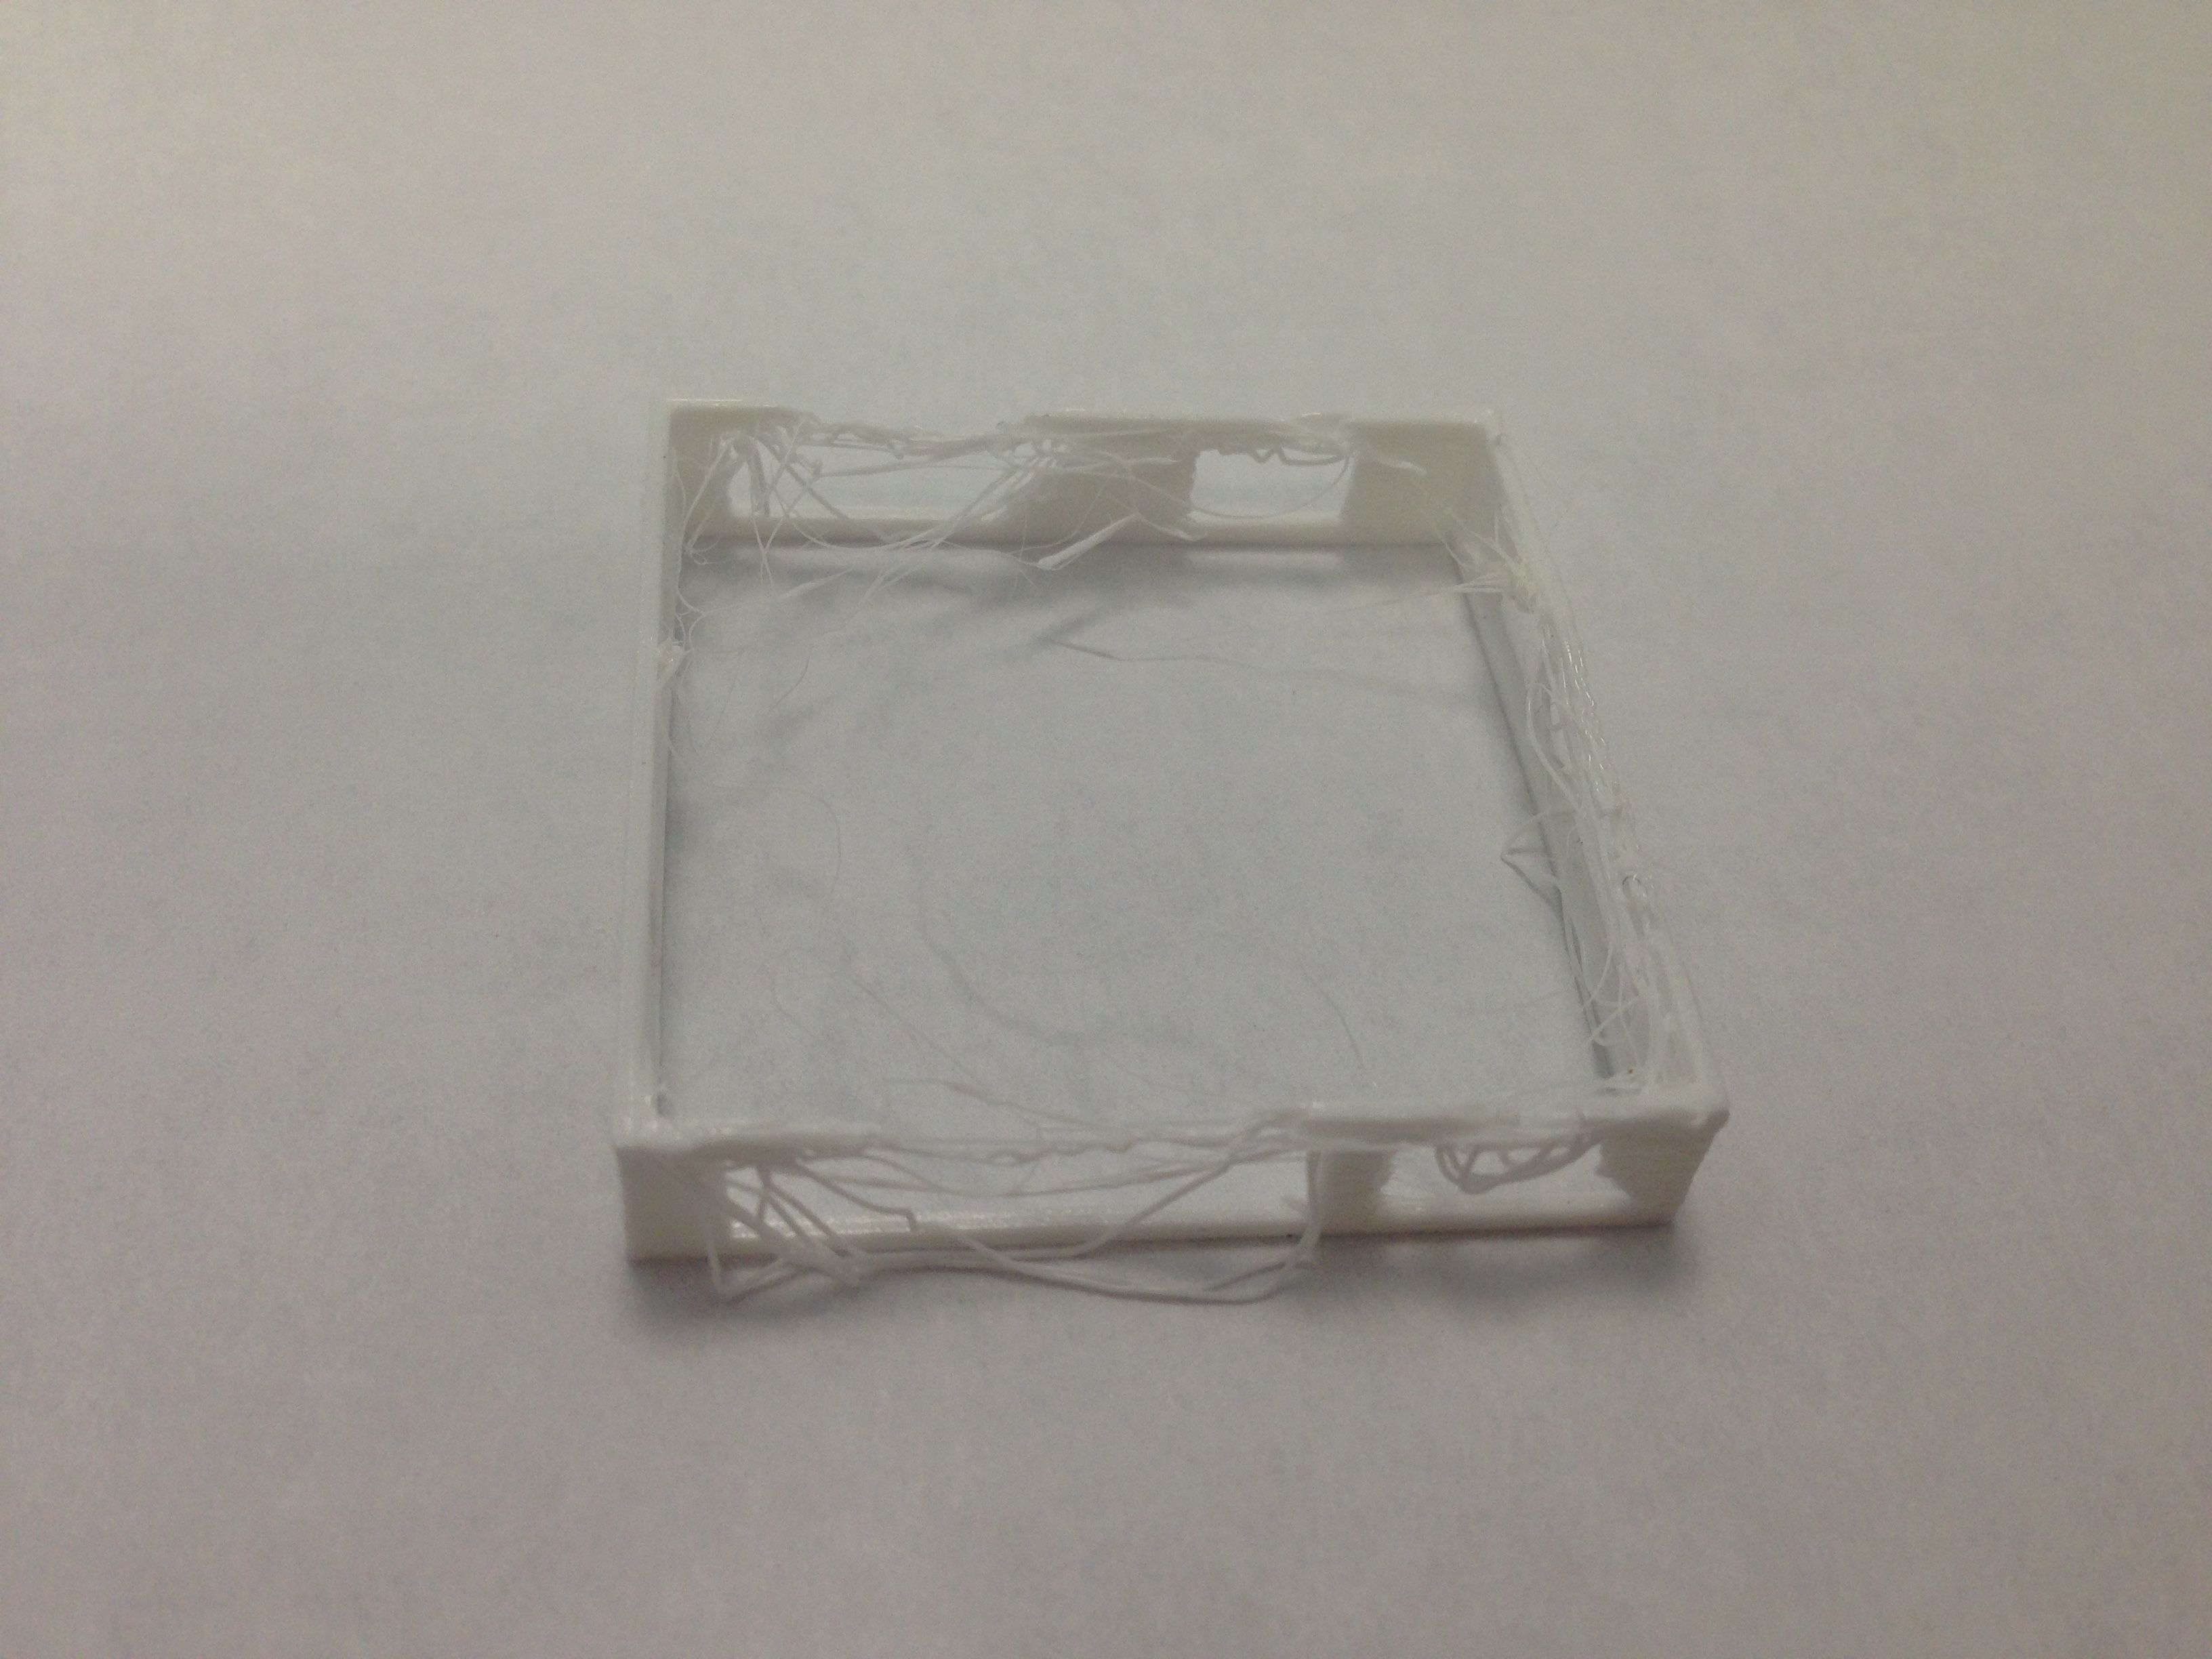
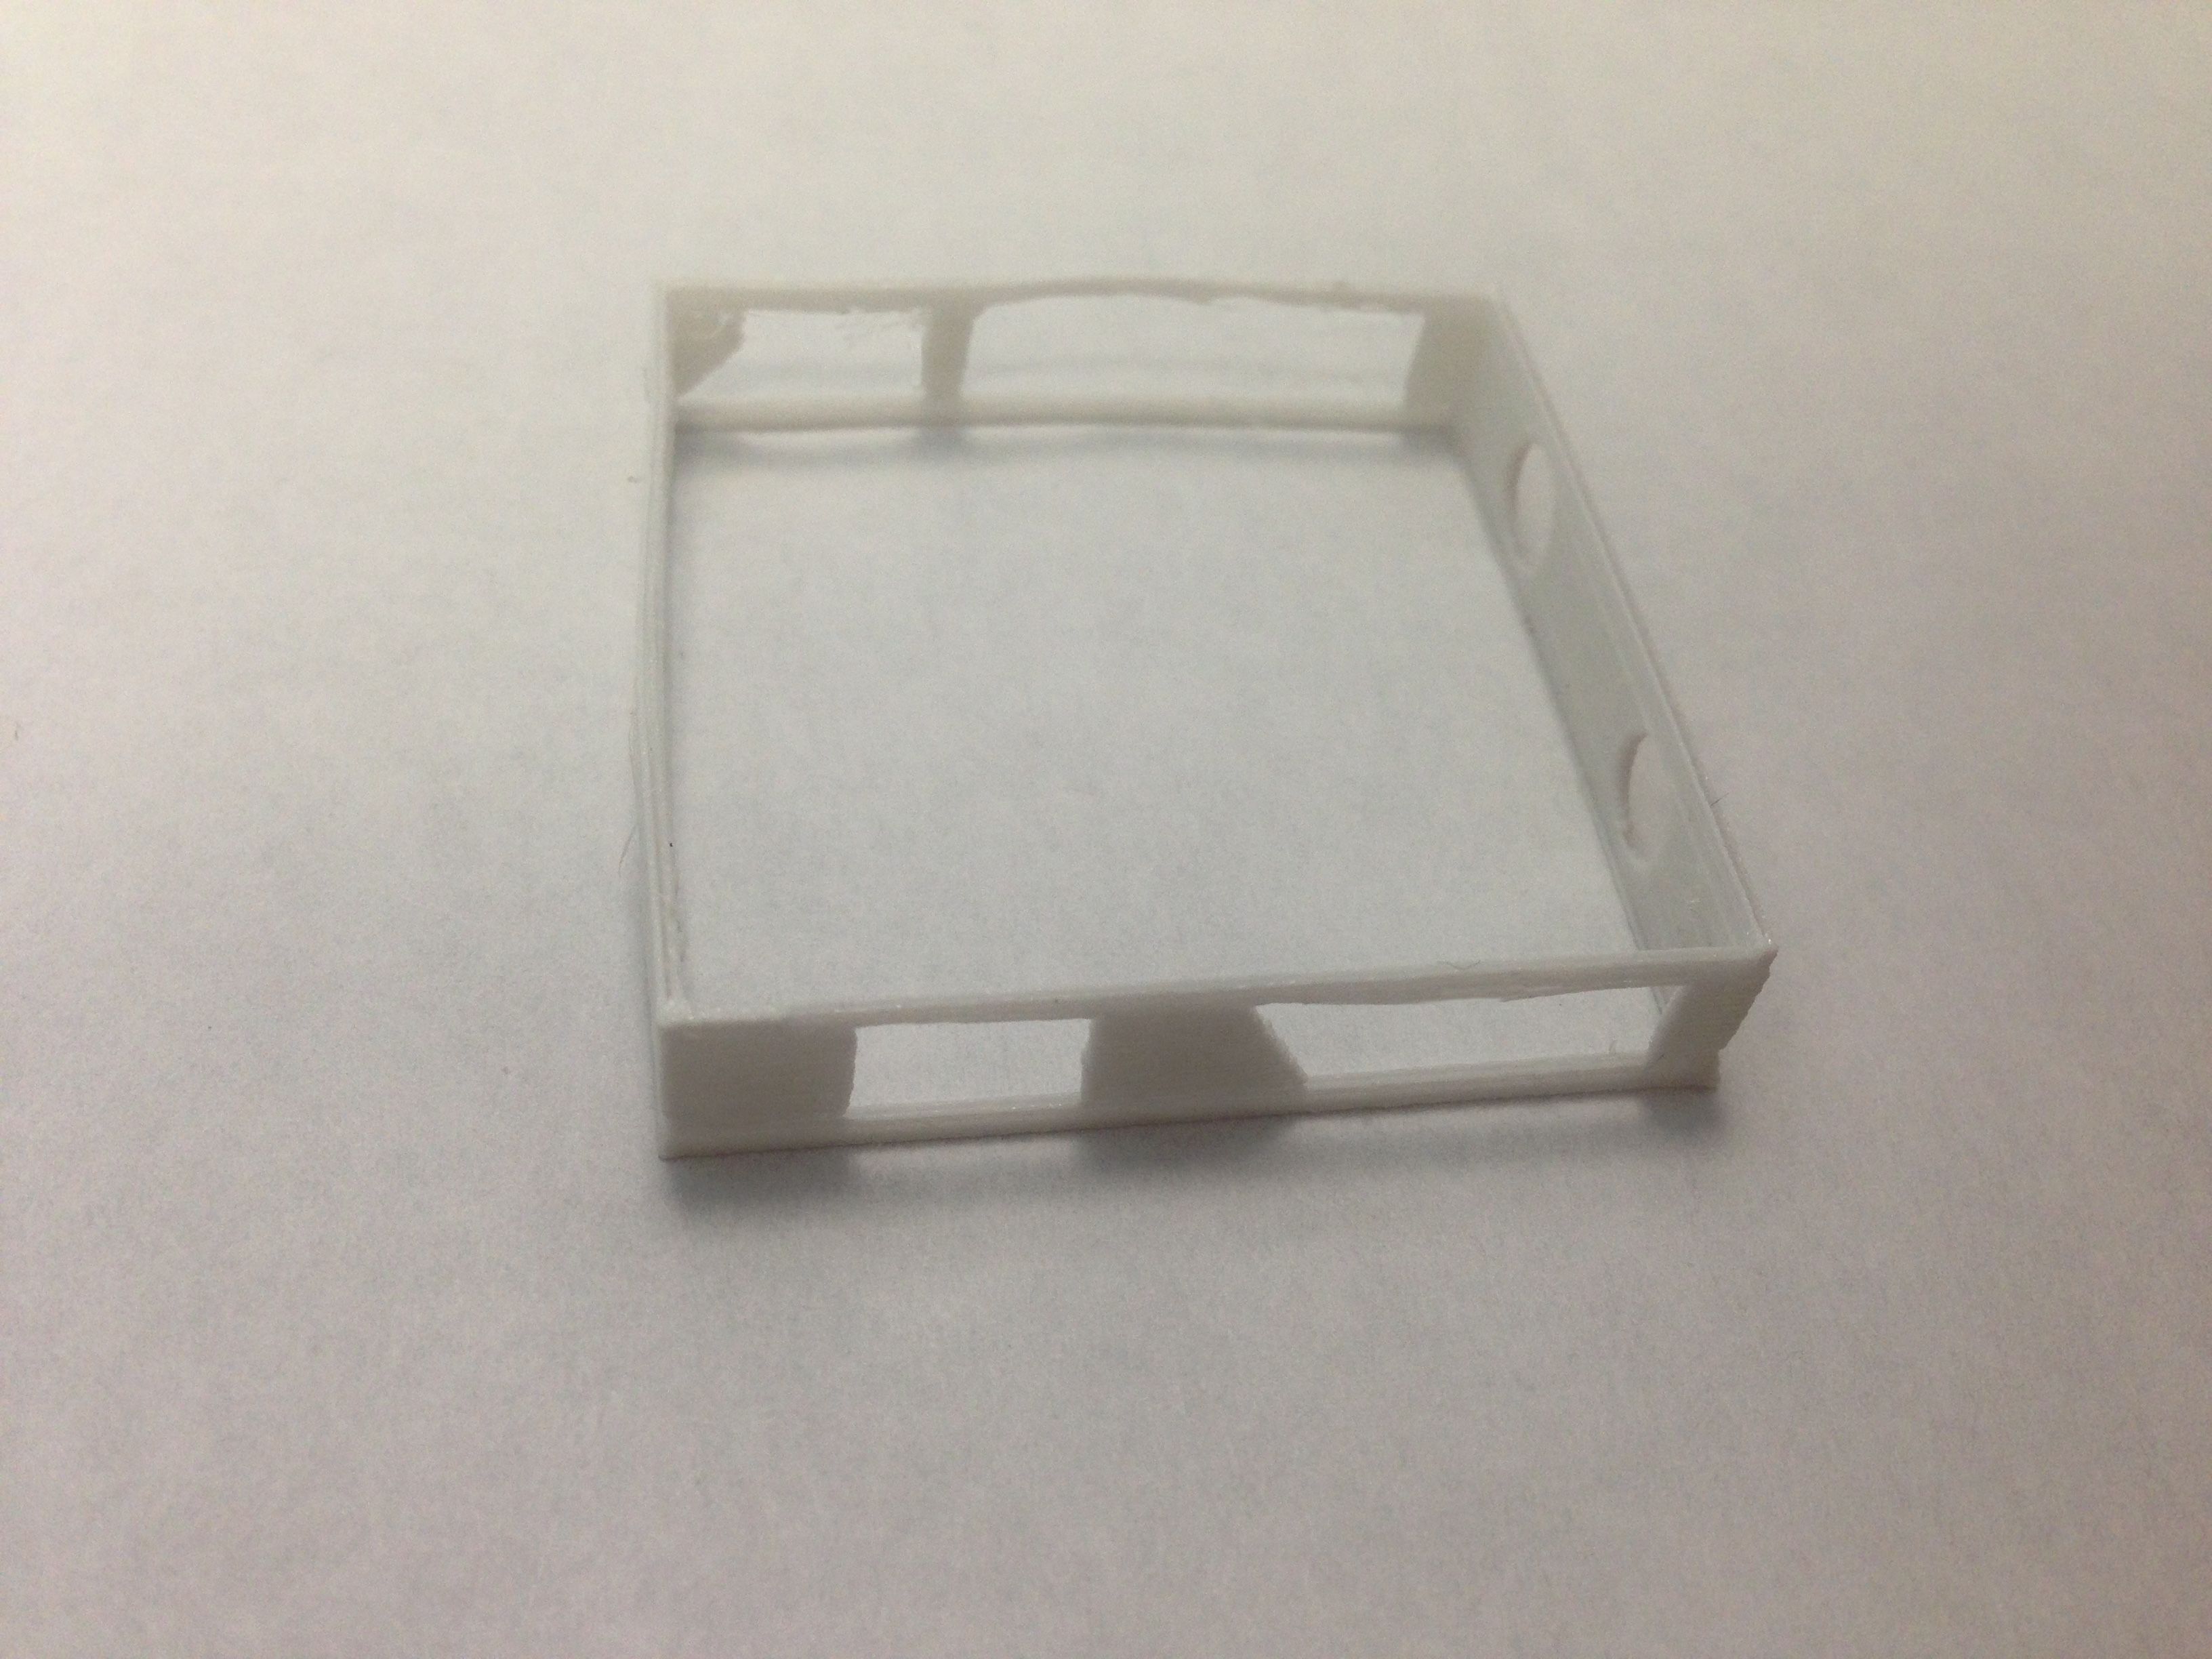
When we use rigid materials such as PLA remove the support, although sometimes tedious, it is usually simple. With the appropriate tools we break the support structure and remove it. This is because support structures are often thin and brittle with rigid materials.
_1.gif) |
| Removing flexible supports |
With flexible materials things change. Although the support structures remain thin, the very nature of the material means that it does not break. So the only way to remove the support material is by stretching or cutting in the worst cases.
What should be taken into account when configuring support for flexible materials?
There are two key aspects when setting it up: the support pattern and the gap between the support and the part.
As we have said before, the only way to remove the support in 3D printed parts with flexible filament is to stretch. This is why we must configure the support in a way that makes this task easier for us.
Speaking of thesupport pattern, it is best to reduce the contact points by trying to make the supported surface as large as possible. We have to avoid types of support in which the structure crosses each other, such as a support with a grid pattern. Our choice is always a support with a cross pattern since the area it supports is much larger but the contact points are always a single line.
To see this we are going to compare the single line pattern with the cross pattern.
_1.png)
As you can see for the same area, the cross pattern supports more areas than the others with the advantage that it always maintains the minimum contact surface, not like the grid support that when intersecting creates areas where removing the support is going to be more difficult for us.
The other fundamental parameter is the separation between the piece and the support. If we leave it too close together, the support will fuse with the piece, making its removal impossible. If we separate it too much it will not be able to withstand the layers of 3D printing, resulting in a disaster.
Recommended parameters to generate support with eFil
Taking into accountAll of the above, the parameters we recommend for the eFil range of flexible filaments are:
| Cantilever angle | 45º |
| Density | 25% |
| Support pattern | Cross |
| Z distance on the support | 0.19mm |
| X/Y distance on the support | 0.7mm |
| Priority in support distances | Z over X/Y |
You can find all the technical sheets of our products at https://www.3dfils.com/en/content/downloads.html